Ok, as promised here is an explanation of the first stages of one of my paintings. I began by figuring out a good size for the canvas, I prefer to paint life-size or larger, I was originally going to paint this picture as big as possible but it would have cost a lot and it’s hard enough finding space in the college studio for a normal size canvas, let alone one that’s huge. I ended up settling on 280 + 68cm.
To transfer the image onto the canvas I find the easiest way is to use the grid system, I start by placing a grid on the image using photoshop then draw the grid onto the canvas with pencil (usually around a couple of centimetres square) then transfer the basic areas of the image onto the canvas.


I am always tempted to draw in a lot of details at this point but have found there is no point really because the next stage makes fine detail hard to see. The next stage is basically just a coat of titanium white with a little bit of thinner to make it flow better. I paint it on quite softly so it leaves the pencil drawing visible underneath the layer of paint. As can be seen in the following pictures you cannot see the fine detail, just the basic areas. This means once this first layer is dry I will still have enough of a guide to put down the first painted sketch.


My feelings at this point is trepidation, before I start a painting I always have a strange fear that I will have forgotten how to paint, I can’t seem to remember what it is I do until I am doing it! I am hoping by explaining each stage on here I might be able to alleviate this fear in the future.
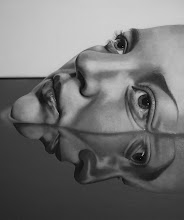
Whilst preparing for this painting I have decided I want to do yet another painting of Kevin, he has basically become the main subject of my final project! I am so glad he got in touch with the college when he did because I don’t know anyone else that I could have done so much work with, I think this shows how good a model Kevin is, he is the most diverse model I have ever had! The image I am going to do is a close up of his head/face, I love painting really closely cropped faces and I think it’s what I do best so it would be stupid not to do one for my final project. I am also going to do this one as large as I can, probably about 8ft wide by about 10ft high. We are going to do the photo-shoot on Monday and I will post the photo I chose as soon as I have decided which one to use, this might take some time because I know he will give me a lot to choose from!
Whilst preparing for this painting I have decided I want to do yet another painting of Kevin, he has basically become the main subject of my final project! I am so glad he got in touch with the college when he did because I don’t know anyone else that I could have done so much work with, I think this shows how good a model Kevin is, he is the most diverse model I have ever had! The image I am going to do is a close up of his head/face, I love painting really closely cropped faces and I think it’s what I do best so it would be stupid not to do one for my final project. I am also going to do this one as large as I can, probably about 8ft wide by about 10ft high. We are going to do the photo-shoot on Monday and I will post the photo I chose as soon as I have decided which one to use, this might take some time because I know he will give me a lot to choose from!